Understanding the Importance of Electric Scooter Maintenance
The surge in electric scooter popularity across American cities has revolutionized urban transportation. Whether you’re zipping through crowded streets on your daily commute or enjoying leisurely weekend rides, your electric scooter represents both a significant investment and a valuable transportation asset. However, like any mechanical device, electric scooters require regular maintenance and occasional repairs to keep them running smoothly and safely.
✨Was this helpful? Spread the word! 🚀
According to a 2024 study by the Urban Mobility Research Institute, regular electric scooter repair and maintenance can extend a scooter’s lifespan by up to 60% and reduce operational costs by nearly 40%. Despite these compelling statistics, many riders neglect basic maintenance until something goes wrong – often resulting in costly professional repairs or, worse, premature replacement.
This comprehensive guide will empower you with the knowledge and techniques needed to diagnose, troubleshoot, and fix common electric scooter issues. From battery care to motor maintenance, brake adjustments to tire replacements – we’ll cover everything you need to know about electric scooter repair, helping you save money while ensuring your ride remains reliable and safe.
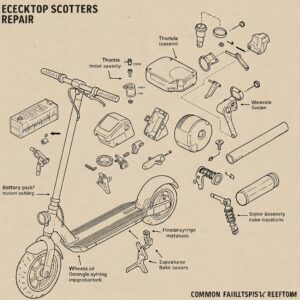
Understanding Your Electric Scooter’s Anatomy
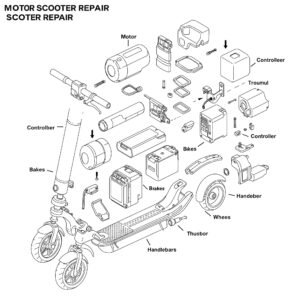
Before diving into specific repair techniques, it’s essential to understand the basic components that make up your electric scooter. This foundational knowledge will help you diagnose problems more effectively and communicate with repair professionals when necessary.
Key Components of an Electric Scooter
- Battery System ⚡ – The heart of your electric scooter, typically lithium-ion batteries that power everything
- Electric Motor 🔌 – Converts electrical energy into mechanical motion
- Controller 🎮 – The brain that regulates power flow and manages scooter functions
- Throttle ✋ – Controls acceleration and speed
- Braking System 🛑 – Usually a combination of electronic and mechanical brakes
- Tires and Wheels 🛞 – Either pneumatic (air-filled) or solid
- Frame and Deck 🛴 – The structural components supporting everything
- Suspension System 🔄 – Present in some models to absorb shocks
- Dashboard/Display 📊 – Shows speed, battery level, and other information
- Lights and Horn 💡 – Safety features for visibility and signaling
Understanding how these components interact helps tremendously when troubleshooting issues. For example, if your scooter won’t power on, the problem could lie in the battery, controller, or connections between components – knowing this narrows your diagnostic approach.
Essential Tools for Electric Scooter Repair
Having the right tools on hand makes electric scooter repair significantly easier and more effective. Here’s a comprehensive list of tools that every scooter owner should consider having:
Basic Tools
- Allen wrench set 🔧 – Most scooters use hex bolts of various sizes
- Screwdriver set 🪛 – Both Phillips and flathead in multiple sizes
- Adjustable wrench 🔧 – For various nuts and bolts
- Tire pressure gauge 📊 – Essential for pneumatic tires
- Multimeter ⚡ – For testing electrical components and voltage
- Wire cutters/strippers ✂️ – For electrical repairs
- Pliers set 🗜️ – Regular and needle-nose for gripping and manipulating parts
Specialized Tools
- Bicycle pump with Schrader valve adapter 💨 – For inflating pneumatic tires
- Battery tester 🔋 – Specifically for lithium-ion batteries
- Torque wrench 🔧 – For precise tightening of critical components
- Tire removal tools 🛞 – Especially helpful for solid tire replacements
- Thread-locking compound 🧪 – Prevents vibration-induced loosening
Maintenance Supplies
- Silicone lubricant 💦 – For moving parts (avoid petroleum-based products)
- Contact cleaner 🧼 – For electrical connections
- Brake fluid (if applicable) 🛑 – For hydraulic brake systems
- Electrical tape 📏 – For insulating wire connections
- Zip ties 🔗 – For securing cables and temporary fixes
For serious electric scooter repair enthusiasts, I recommend the iFixit Pro Tech Toolkit. This comprehensive set includes precision bits that fit most scooter fasteners and comes with specialized pry tools useful for accessing tight spaces in your electric scooter.
Common Electric Scooter Problems and Their Solutions
Let’s explore the most frequent issues electric scooter owners encounter and the step-by-step solutions to fix them:
1. Battery-Related Issues
Battery problems are among the most common electric scooter repair challenges owners face. Here’s how to address them:
Reduced Range and Battery Life
✅ Symptoms: Shorter rides between charges, diminished performance
✅ Causes: Battery degradation, charging issues, controller problems
✅ Solution:
- Verify charging is complete (most scooters show a green light when fully charged)
- Check for proper charger output using a multimeter
- Reset the Battery Management System (BMS) by following manufacturer instructions
- Replace the battery if it’s beyond its useful life (typically 300-500 charge cycles)
For professional-grade battery testing, the ANCEL BST100 Battery Tester provides accurate diagnostics for lithium-ion batteries, helping you determine if replacement is necessary.
Battery Won’t Charge
✅ Symptoms: Charger LED doesn’t light up, battery level doesn’t increase
✅ Causes: Faulty charger, damaged charging port, BMS issues
✅ Solution:
- Inspect charging port for physical damage or debris
- Test outlet with another device to ensure power is available
- Measure charger output with a multimeter (should match specifications)
- Check connections between charging port and battery
- If all else fails, consider replacing the charger or seeking professional help
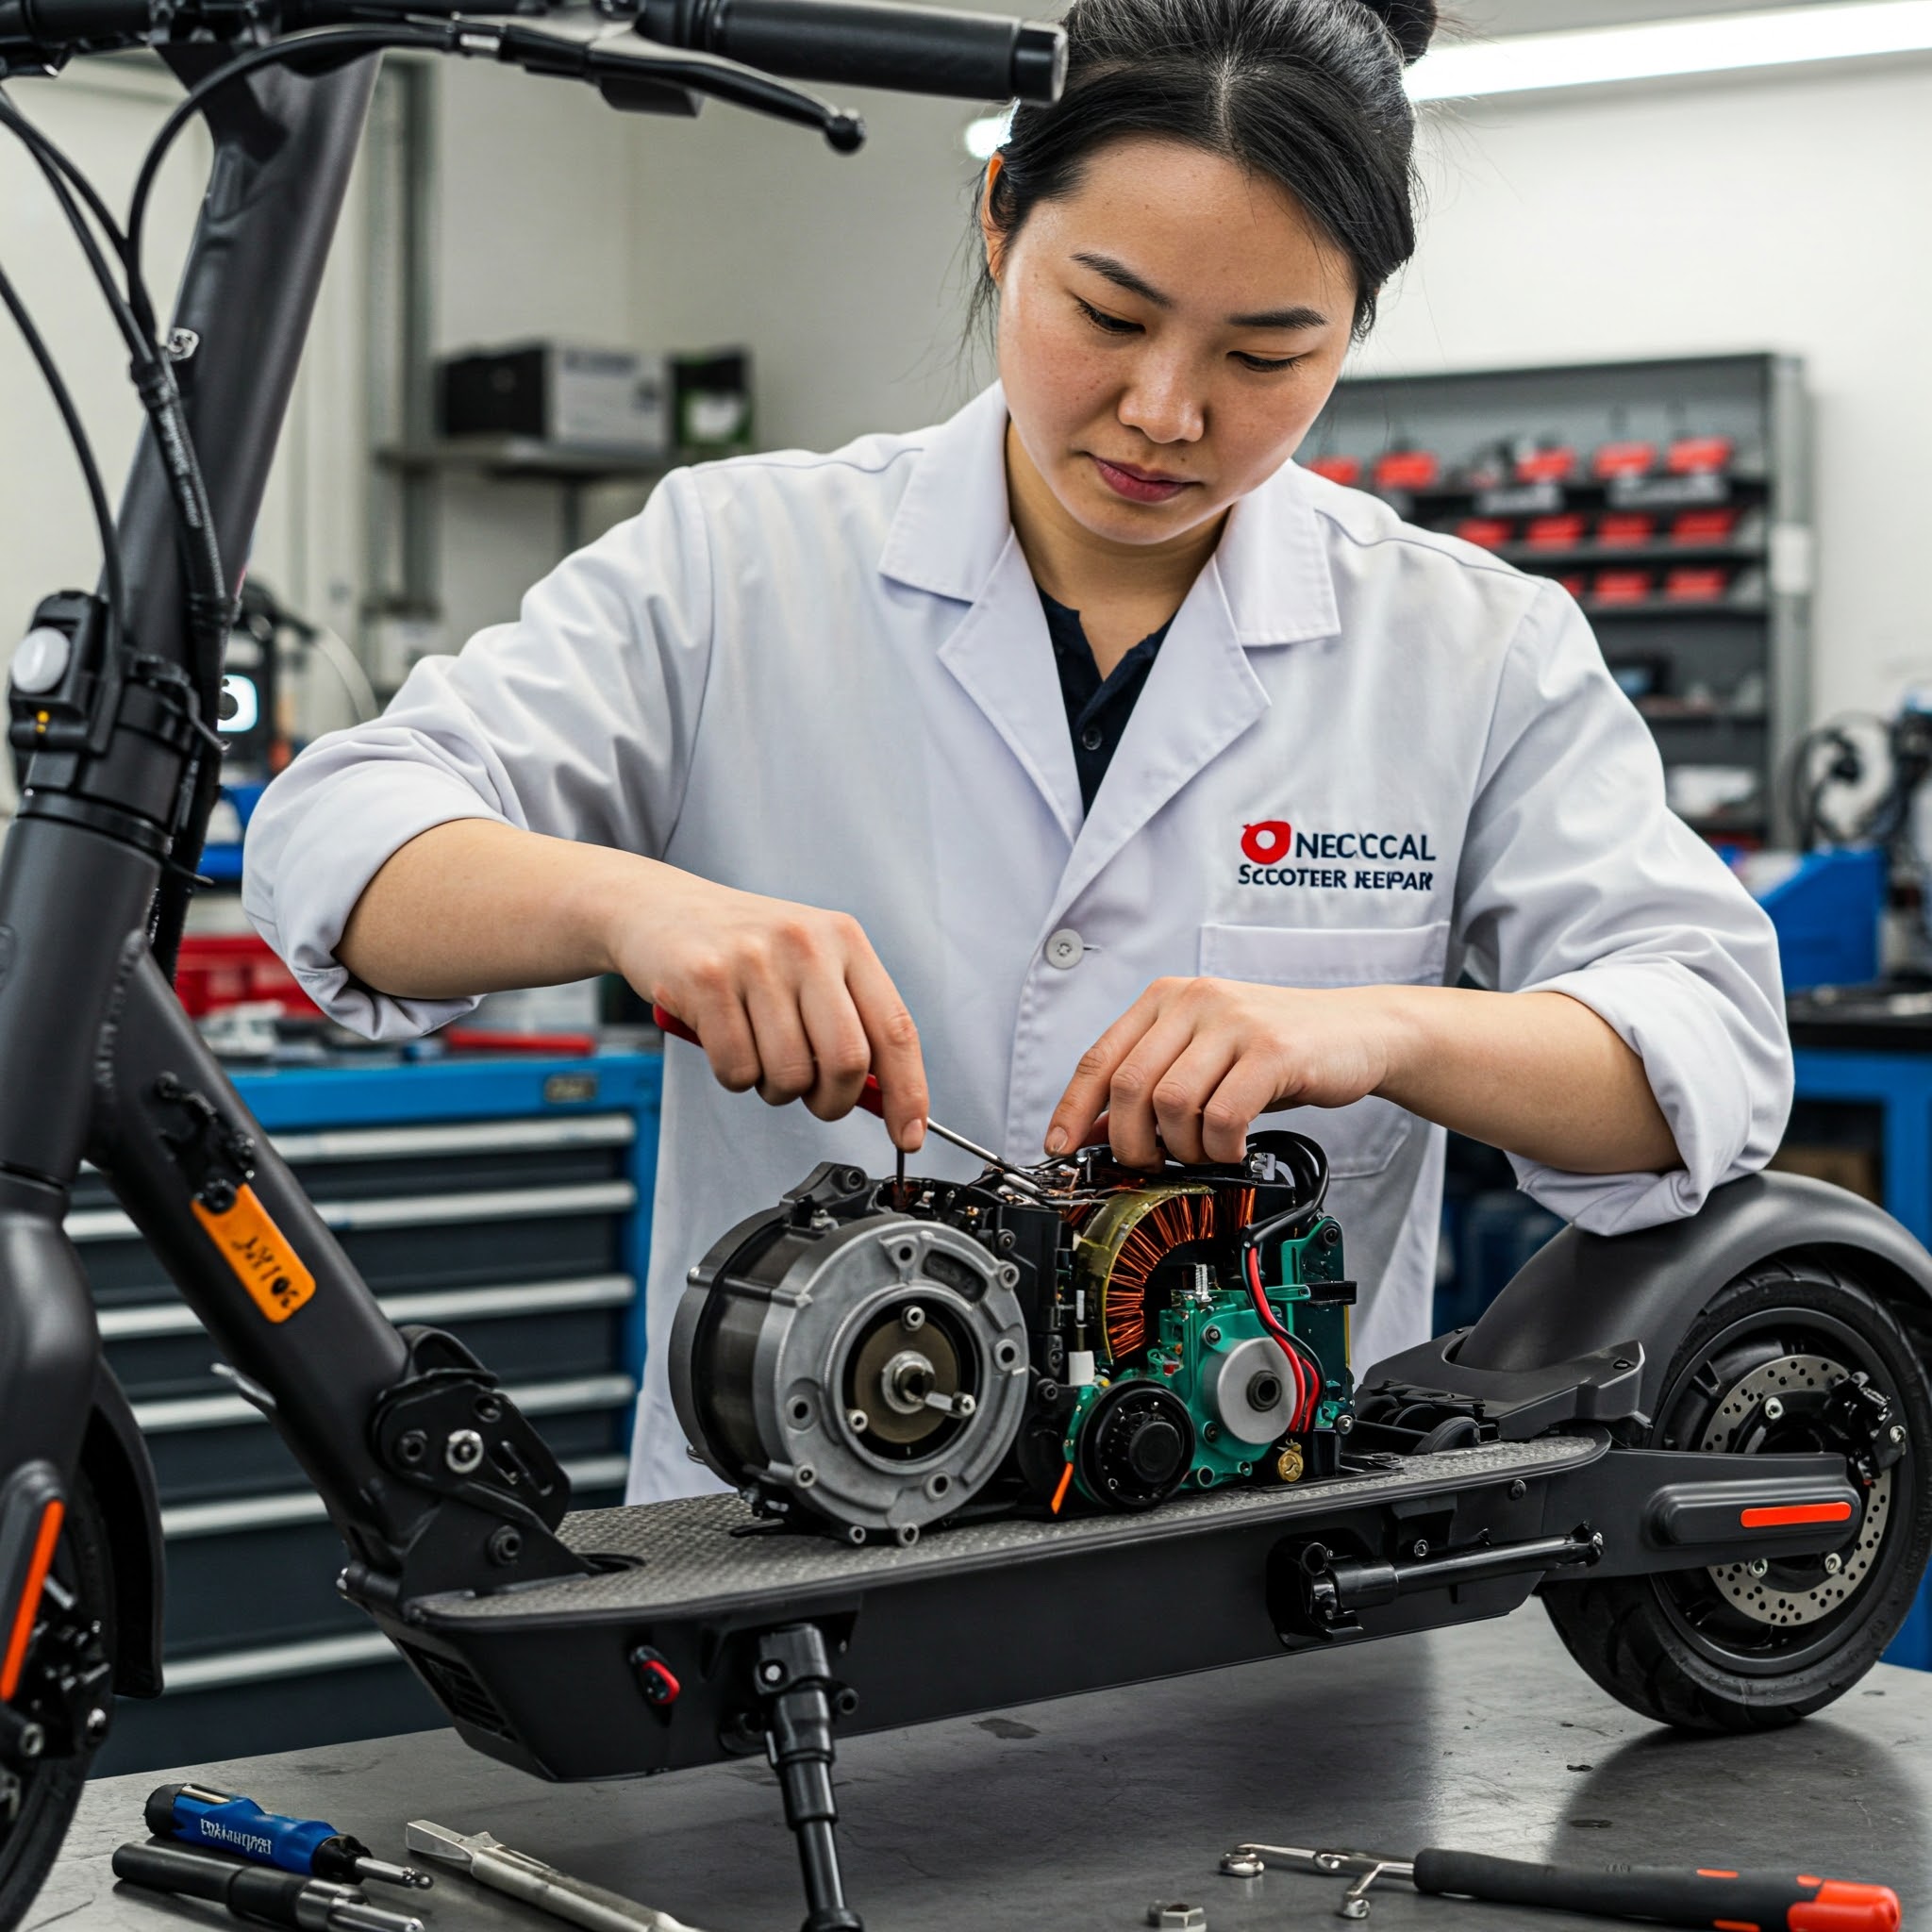
2. Motor Problems
Electric motors are generally reliable, but they can develop issues over time:
Motor Stuttering or Cutting Out
✅ Symptoms: Inconsistent power delivery, jerky acceleration
✅ Causes: Loose connections, controller issues, motor damage
✅ Solution:
- Check all electrical connections leading to the motor
- Inspect motor wires for damage or fraying
- Clean contacts with electrical contact cleaner
- Test controller output (may require professional assistance)
- If necessary, replace damaged components
Motor Overheating
✅ Symptoms: Reduced performance after riding, hot motor casing
✅ Causes: Excessive load, blocked ventilation, internal damage
✅ Solution:
- Allow motor to cool completely before inspection
- Clear debris from ventilation areas
- Check for mechanical resistance in the wheel
- Avoid steep inclines and excessive loads that strain the motor
- Consider reducing speed settings if your scooter offers this option
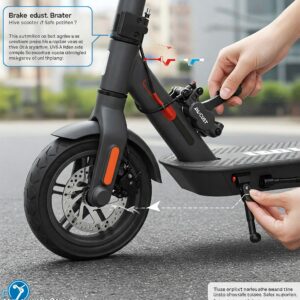
3. Brake System Issues
Properly functioning brakes are critical for safety:
Weak or Unresponsive Brakes
✅ Symptoms: Increased stopping distance, weak braking force
✅ Causes: Worn brake pads, misalignment, cable issues
✅ Solution:
- Inspect brake pads for wear and replace if necessary
- Adjust brake cable tension (for mechanical brakes)
- Align brake calipers to ensure even pad contact
- Bleed hydraulic brakes if your system uses them
- Clean disc rotors with alcohol to remove contamination
The Jagwire Pro Hydraulic Brake Bleed Kit is an excellent investment for those with hydraulic brake systems, making the bleeding process simple and mess-free.
Squeaking or Grinding Brakes
✅ Symptoms: Noise during braking, reduced effectiveness
✅ Causes: Contaminated brake components, misalignment, worn parts
✅ Solution:
- Clean brake discs and pads with isopropyl alcohol
- Sand glazed brake pads lightly with fine-grit sandpaper
- Adjust caliper alignment to ensure even pad contact
- Replace worn components as needed
Tire and Wheel Maintenance
Tires significantly impact ride quality, range, and safety:
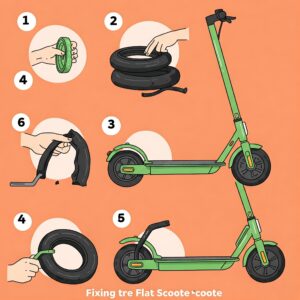
Flat Tire Repair
For Pneumatic (Air-Filled) Tires
✅ Symptoms: Decreased ride comfort, rim touching ground, visible damage
✅ Causes: Punctures, valve issues, impact damage
✅ Solution:
- Remove the wheel from the scooter
- Deflate the tire completely
- Use tire levers to separate tire from rim
- Locate the puncture (water test or visual inspection)
- Apply appropriate patch or replace inner tube
- Reassemble and inflate to recommended pressure
For quick roadside repairs, I recommend keeping the Slime 50107 Smart Spair Emergency Tire Repair Kit in your bag. This all-in-one solution can temporarily seal punctures until you can perform a proper repair.
For Solid Tires
✅ Symptoms: Cuts, chunks missing, excessive wear
✅ Causes: Normal wear and tear, impacts, manufacturing defects
✅ Solution:
- Remove wheel from scooter
- Use appropriate tools to remove the old tire
- Clean the rim thoroughly
- Install new tire using lubricant to ease installation
- Ensure proper seating before reinstalling wheel
Wheel Alignment Issues
✅ Symptoms: Scooter pulls to one side, uneven tire wear
✅ Causes: Loose axle nuts, frame damage, improper assembly
✅ Solution:
- Check axle nuts and tighten to specified torque
- Verify wheel is centered in fork/frame
- Inspect frame for signs of damage or bending
- Realign components as needed
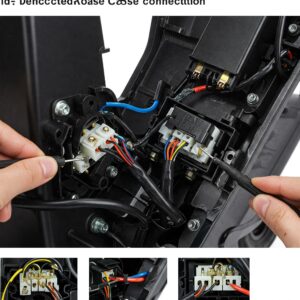
Electrical System Troubleshooting
Electrical issues can be intimidating but are often solvable with systematic testing:
Display/Dashboard Problems
✅ Symptoms: Blank display, incorrect readings, flickering
✅ Causes: Loose connections, water damage, component failure
✅ Solution:
- Check all connections to the display
- Inspect for water damage or condensation
- Test voltage with multimeter to ensure proper power delivery
- Reset controller if possible (often by specific button combination)
- Replace display if necessary
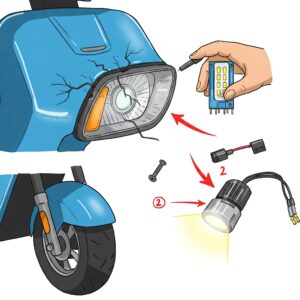
Lighting System Repairs
✅ Symptoms: Dim or non-functioning lights
✅ Causes: Wiring issues, burned-out LEDs, controller problems
✅ Solution:
- Check connections at both the light and controller
- Test voltage at light connections
- Inspect for water damage
- Replace LED assembly if necessary
For enhanced visibility and safety, consider upgrading to the NiteRider Lumina Micro 850 LED light system for your electric scooter. This powerful lighting solution ensures you’re visible to others and can see potential hazards in your path.
Advanced Electric Scooter Repair: Controller Troubleshooting
The controller is the brain of your electric scooter, managing power flow between the battery and motor. Issues here can cause various symptoms:
Controller Diagnosis
✅ Symptoms: Scooter won’t power on, erratic behavior, motor issues
✅ Causes: Water damage, overheating, component failure
✅ Solution:
- Disconnect battery and inspect controller for visible damage
- Check for burned components or corrosion
- Test input and output voltages with a multimeter
- Verify all connections are secure
- Replace controller if internal damage is found
According to research published in the Journal of Electric Vehicle Technology, controller failures account for approximately 22% of all electric scooter malfunctions, highlighting the importance of keeping this component protected from moisture and extreme temperatures.
Firmware Updates
Many modern electric scooters have updateable firmware that can resolve bugs and improve performance:
- Check manufacturer’s website for available updates
- Follow instructions precisely for your specific model
- Ensure stable power supply during update process
- Avoid disconnecting during updates to prevent bricking the controller
Creating a Maintenance Schedule
Preventative maintenance dramatically reduces the need for electric scooter repair. Here’s a recommended schedule:
Daily Checks (Before Riding)
- Tire pressure (if pneumatic)
- Brake function
- Lights operation
- Battery charge level
- Loose or rattling parts
Weekly Maintenance
- Detailed brake inspection
- Tightening of critical fasteners
- Battery connections cleaning
- Tire inspection for wear or damage
Monthly Service
- Comprehensive bolt check and tightening
- Lubrication of moving parts
- Brake adjustment and pad inspection
- Battery health check
- Controller inspection
Quarterly Deep Maintenance
- Complete disassembly and cleaning of key components
- Electrical system inspection
- Bearing check and lubrication
- Replacement of worn parts
Comparison of Electric Scooter Repair Costs: DIY vs. Professional Service
| Repair Type | Average Professional Cost | DIY Cost | Tools Required | Difficulty Level | Time Required |
|---|---|---|---|---|---|
| Flat Tire | $45-$75 | $10-$30 | Basic | Medium | 30-60 mins |
| Battery Replacement | $150-$500 | $100-$400 | Basic | Easy | 15-30 mins |
| Brake Adjustment | $30-$60 | $0-$15 | Basic | Easy | 15-30 mins |
| Controller Replacement | $100-$250 | $70-$200 | Advanced | Hard | 60-120 mins |
| Motor Replacement | $200-$350 | $150-$300 | Advanced | Hard | 60-120 mins |
| Display Replacement | $80-$150 | $50-$120 | Basic | Medium | 30-45 mins |
💬 Just one click – help others make better buying decisions too!😊
🔌 Upgrade Your Electric Scooter Repair Skills Today!
➡ Don’t let simple mechanical issues keep you off the road or drain your wallet! With the right tools and knowledge, you can handle most electric scooter repairs yourself, saving hundreds of dollars annually while keeping your ride in peak condition. Click on any of our recommended products above to elevate your repair capabilities! 🛠️⚡
Essential Electric Scooter Repair Products You Should Own
🔧 Maintenance Tools and Kits
- iFixit Pro Tech Toolkit – This comprehensive 64-piece set includes precision bits for all the tiny screws on your electric scooter, along with specialized pry tools and anti-static tweezers. The magnetic project mat helps keep track of small parts during repairs.
- ANCEL BST100 Battery Tester – This professional-grade battery analyzer helps diagnose battery health issues before they leave you stranded. It provides accurate readouts of voltage, resistance, and overall battery condition.
- WOTOW 16-in-1 Multi-Function Bike Tool – A compact tool that includes all the essentials for emergency roadside electric scooter repair. The built-in hex keys, screwdrivers, and wrenches cover most adjustments you’ll need to make.
🛠️ Don’t Miss These Essential Repair Products!
→ Invest in these quality tools today to save hundreds on professional repairs down the road. Click any highlighted product to check current pricing and availability. With these in your toolkit, you’ll be prepared to handle almost any electric scooter repair challenge! 🛠️🔧
🔋 Battery Solutions
- Weize 36V 14.5Ah Lithium Battery Pack – A universal replacement battery compatible with many popular electric scooter models. Features BMS protection and premium cells for reliable performance and longevity.
- Slime 10004 Inner Tube Sealant – Prevents and repairs punctures in pneumatic tires, potentially saving you from the hassle of tube replacement. One application lasts up to two years.
🛞 Tire and Wheel Solutions
- Slime 50107 Smart Spair Emergency Tire Repair Kit – This portable kit combines sealant and a compact inflator to get you back on the road quickly after a flat. Perfect for emergency situations.
- Fenix 10-inch Replacement Inner Tubes – Universal inner tubes compatible with most 10-inch scooter wheels. These durable tubes resist punctures better than standard options.
DIY vs. Professional Repair: When to Call the Experts
While many electric scooter repair tasks can be handled by owners with basic tools and knowledge, some situations warrant professional intervention:
When to DIY
✅ Battery replacement
✅ Tire changes and patching
✅ Brake adjustments
✅ Basic electrical troubleshooting
✅ Regular maintenance
When to Seek Professional Help
❌ Controller reprogramming
❌ Major electrical system failures
❌ Frame damage or structural issues
❌ Motor rebuilding
❌ Water damage restoration
❌ Warranty repairs
According to a survey by Consumer Reports, 68% of electric scooter owners who attempted DIY repairs saved an average of $122 per repair compared to professional service costs. However, unsuccessful DIY attempts that later required professional intervention ended up costing an average of 40% more than if the owner had sought professional help initially.
Safety Considerations for Electric Scooter Repair
Safety should always be your priority when performing electric scooter repair:
Electrical Safety
- Always disconnect the battery before working on electrical components
- Use insulated tools when possible
- Never short circuit connections or battery terminals
- Wear rubber-soled shoes when testing live circuits
- Work in dry conditions to avoid shock hazards
Mechanical Safety
- Use appropriate tools for each job
- Secure the scooter before working on it
- Wear protective gloves to prevent cuts and abrasions
- Test all safety systems before riding after repairs
- Follow torque specifications for critical fasteners
Battery Safety
- Never puncture or disassemble lithium-ion batteries
- Keep batteries away from heat sources
- Use only chargers specified by the manufacturer
- Store batteries at 40-80% charge when not in use
- Dispose of old batteries properly at recycling facilities
Prolonging Your Electric Scooter’s Lifespan Through Proper Maintenance
Research from the Transportation Research Institute indicates that well-maintained electric scooters last 3-5 years longer than neglected ones. Here are some expert tips to maximize your scooter’s lifespan:
Battery Longevity Tips
- Avoid complete discharges whenever possible
- Store at 40-80% charge when not using for extended periods
- Keep batteries at moderate temperatures (59-77°F or 15-25°C)
- Use only the manufacturer’s charger
- Allow cooling before charging after rides
Structural Protection
- Clean regularly to prevent corrosion
- Apply corrosion inhibitor to metal components
- Store indoors away from extreme temperatures and moisture
- Check fasteners regularly for proper torque
- Address minor issues promptly before they become major problems
Weather Considerations
Electric scooters face different challenges depending on the climate:
Cold Weather Care
- Keep battery warm before riding
- Store indoors when temperatures drop below freezing
- Apply appropriate lubricants that won’t thicken in cold
- Check tire pressure frequently (cold air decreases pressure)
Hot Weather Protection
- Avoid leaving in direct sunlight
- Allow cooling periods during extended rides
- Check for overheating components
- Maintain proper tire pressure (heat increases pressure)
Wet Conditions
- Thoroughly dry after exposure to moisture
- Apply water-resistant lubricants to moving parts
- Check electrical connections for corrosion
- Consider silicone conformal coating for circuit boards
Conclusion: Mastering Electric Scooter Repair
Throughout this comprehensive guide, we’ve covered essential aspects of electric scooter repair and maintenance, from basic troubleshooting to advanced component replacement. By developing these skills, you not only save money but also gain a deeper understanding of your vehicle’s operation, leading to better riding habits and prolonged scooter life.
Remember that preventative maintenance is always preferable to reactive repairs. By following the maintenance schedule outlined in this guide and addressing minor issues promptly, you can avoid many common problems that plague electric scooters.
As the electric scooter market continues to evolve, staying informed about best practices and emerging repair techniques will ensure your scooter remains reliable, safe, and enjoyable for years to come. Consider joining online forums and communities dedicated to electric scooter enthusiasts to share experiences and learn from others.
🔋 Take Action Today to Protect Your Investment!
➡ Don’t wait until you’re stranded with a non-functioning scooter! Implement these repair and maintenance strategies today to ensure reliable transportation tomorrow. Your wallet (and future self) will thank you for the proactive approach to electric scooter care! 🛠️⚡🛴
Frequently Asked Questions About Electric Scooter Repair
❓ How much does it typically cost to repair an electric scooter battery?
✅ Between $100-$400 depending on voltage and capacity... Professional installation adds $50-$75 while DIY saves labor costs. Higher-end models with premium batteries cost more but generally last longer...
❓ Can I upgrade my electric scooter motor for better performance?
✅ Yes, but with important compatibility considerations... You must match voltage requirements, physical dimensions, and controller specifications. Upgrades typically cost $80-$250 plus installation and may require additional modifications to your power system...
❓ What tools are essential for electric scooter repair at home?
✅ Allen wrench set, screwdrivers, multimeter, and tire repair kit... Begin with these basics ($50-$100 total) and expand as needed. Quality tools pay for themselves by enabling DIY repairs that would otherwise cost $75+ at a shop...
❓ How often should electric scooter brakes be replaced?
✅ Typically every 1,000-1,500 miles depending on riding conditions... Urban riders with frequent stops need replacements more often than casual riders. Warning signs include squealing, reduced stopping power, and visible pad wear under 2mm...
❓ What's the best way to fix a flat tire on an electric scooter?
✅ For pneumatic tires, use tire levers to remove the tire, patch or replace the tube, then reinstall... Solid tires require complete replacement by removing the wheel, using a heat gun to soften the tire, and leveraging it off the rim. Prevention through Slime sealant often proves most effective...
Recommended for You:
- E Scooter Repair: 7 Essential DIY Tips to Save Money and Extend Battery Life
- DIY Scooter Repair Guide 2025: Expert Tips to Save Money & Extend Your Ride’s Life
- 10 Lightest Mobility Scooter Options That Will Empower Your Freedom Like Never Before in 2025
Disclaimer: This article contains affiliate links. If you purchase products through these links, we may earn a small commission at no additional cost to you.
✨ Found this helpful? Share it with your friends! 💬🤗